pcdMagic
FAQs
Where can I find more information on Photo CD?
There are still some documents on the Kodak site, but the most comprehensive site that I know of is Ted Felix's site. Ted's site also has links to a lot of other useful sites.
Is there a completely free way to convert PCD images?
Yes, there is pcdtojpeg. pcdtojpeg runs on Windows, OS X and Linux, and uses the same decoder library as pcdMagic, and is open source GPL software. However, it's a command line program, and lacks several of the more advanced features of pcdMagic. There's a comparison of features here.
Is pcdMagic color managed?
Yes, both the OS X and Windows versions of pcdMagic are fully color managed:
- Exported JPEG images are in the sRGB space, and are correctly tagged with the sRBG profile. So any color managed application will display colors correctly;
- Exported TIFF images are in the ProPhoto color space and tagged as such.
Why are exported JPEG images in the sRGB color space rather than something wider like Adobe RGB?
sRGB covers the entire normal PCD gamut, so if you have not extensively post processed the image (e.g., increased color saturation) there's no loss of color information, and sRGB images have the best chance of displaying correctly on non-color managed systems. If you have extensively post-processed the image in pcdMagic, you should select the TIFF export option rather than JPEG. The TIFF option uses the ProPhoto color space.
Why are the color profiles required - I thought that the PCD scanning process automatically adjusted color?
As originally envisaged by Kodak, the PCD scanning process (and specifically the SBA or Scene Balance Algorithm) adjusted the scan parameters to get an optimal image, color rendering to a single standard, and adjusting exposure, contrast, etc. In practice, there are a number of problems. Firstly, the SBA required that film type be correctly identified. However, even if the film type was correctly identified, SBA's white balance algorithm was relatively easily fooled, and was often disabled. In addition, over the life of the Photo CD format, at least two different generations of scanners were used, and several versions of SBA were used, with different results. You can check the SBA status for each individual image in the metadata information that pcdMagic prints out. As a result, in order to get optimum color rendering, film and scanner specific profiles are required. Kodak eventually release six profiles (Kodachrome, other reversal and negative film stock for each of 4000-series and 2000-series scanners)
Why do I sometimes get better color by manually selecting a color profile?
Color profiles are normally automatically selected by pcdMagic, based on the film and scanner information as recorded in the image metadata. However, the Kodak scanners required careful setting up to give optimal performance, and to detect film type correctly. Unfortunately, in many labs this didn't happen. As a result, pcdMagic also allows for color profiles to be set manually.
Can I use Kodak Color profiles - I've never been able to use them with any other software?
pcdMagic for the Mac does offer the ability to use the original Kodak profiles. It's not however available with the Windows version. However, pcdMagic's internal profiles are for practical purposed indistinguishable from the the original Kodak profiles.
Is there a difference between the Kodak color profiles and pcdMagic's internal profiles?
Yes, there is a technical difference - pcdMagic's internal profiles are RGB profiles, designed to emulate the original Kodak YCC profiles. This is both for reasons of copyright, and because RGB profiles give slightly faster image load times. However, in our tests there is no visible difference between the internal and Kodak profiles.
Other image conversion solutions, including most commercial software, blow highlights, get the colors wrong, or only convert at low resolution. What's so difficult about PCD files?
The PCD format was developed in the early 1990's, when many of the color standards that we take for granted today didn't exist. In addition, the format was designed in such a way that it could display on the TV's of the day with very cheap and simple hardware. The most notable "gotcha's" are:
- Kodak has publicly released only small parts of the the PCD specification. Understanding it at all is a challenge - Hadmut Danisch reverse engineered the format in the early 1990's and wrote hpcdtoppm based on his work. Subsequent to that, various additional pieces of information have leaked into the public domain, but despite Kodak abandoning the format, Kodak have declined to make the detail of the format public.
- The PCD color space is a TV color space (SMTPE), but Kodak allowed for levels of well over 100% of nominal. This is ok for driving an analog TV, but a problem when converting to modern digital systems. Virtually all color management systems on PCs today (be they Apple, Windows or Linux) are based on the ICC model, which simply has no concept of greater than 100% levels. As a result, a simple conversion into a modern color space will either result in incorrect colors, or blown highlights. Often both.
- The PCD format uses a form of gamma encoding that at first sight, looks very much like sRGB. However, it's actually subtly different. Many converters assume that they can apply a pre-packaged sRGB gamma curve. Unfortunately, this results in an image with the mid-tones displaced.
- The PCD file format, because it was designed to allow display of base images by very simple, low-cost hardware, encodes images as a low resolution base image, together with a series of incremental resolution enhancement images, and then uses Huffman compression on the incremental images. In addition, the chroma is subsampled. These types of encoding algorithms were abandoned in the 1990's as inefficient compared to e.g., JPEG encoding which compresses two-dimensional blocks of pixels. As a result, decoding images at full resolution is much more complex than is the case for most modern image formats which use a relatively small number of encoding techniques for which well established bodies of source code exist. For example, almost all modern raw image formats are simple variations of the EXIF format.
The color of exported images are wrong/don't match the pcdMagic screen
You have to use a color managed image viewer and have a calibrated display with correctly configured color management software to get the correct colors. Safari on the Mac is color managed, as is Firefox on PCs. But note that you have to manually enable color management on Firefox. Most good quality dedicated image viewers are color managed, but you should check your specific software.
I can't open the INFO.PCD file
Photo CD's contain a "INFO.PCD" file in their root directory. However, the INFO.PCD file isn't actually an image file - it contains thumbnails and data on all of the image files on the CD. The actual image files are in the "IMAGES" subdirectory of the CD. pcdMagic doesn't use the INFO.PCD file, and will give error messages if you try to open the file.
Program XXXX won't open an exported DNG file
Many image processing packages have only partial DNG support, usually only for camera generated (Bayer mosaic) images. PCD images are RGB, not mosaiced, and so pcdMagic generates so-called "linear DNGs". All recent Adobe products (e.g., PhotoShop, ACR, Lightroom) will read these correctly, but you should check with the publishers of any other software for compatibility.
Troubleshooting
Windows keeps on telling me that has prevented pcdMagic for Windows from running?
By default, Windows "SmartScreen" technology will prevent any program it doesn't recognize from running. Just click on "More Info" in the dialog that Windows 8 displays, and then click "Run Anyway". Note that you might have to do this for both the "setup.exe" program in the installer, and pcdMagic once it's installed.
What's this "drag-and-drop" thing you're talking about?
Drag-and-drop is easy. Just:
- Start pcdMagic for Windows from the Windows Start Menu.
- Find the image file you want using the Windows file explorer.
- Click and hold on the file with the left mouse button, and while continuing to hold teh button, move the file until its over the pcdMagic window. Then release the mouse button.
When I try to install, I get an error message about missing files?
Before installing pcdMagic for Windows, you must extract all the files in the pcdMagic for Windows Zip file to your hard drive. If you don't do this, setup will fail.
When I try to update pcdMagic, I get an error message about 'You cannot start application pcdMagic for Windows from this location because it is already installed from a different location'?
If you get this error message, uninstall the old version of pcdMagic (via the Control Panel) before trying to install the newer version.
When I drag and drop files for conversion, I get an error message about file permissions?
Before conversion, you have to copy the PCD image files (and for 64Base images, the entire CD directory structure) to a hard drive. You can't drag-and-drop files directly from a CD-ROM.
"The application is missing required files" error message when installing
In order to install pcdMagic for Windows, the ZIP file must have been extracted to a location on the disk.
To do that, first use the "Extract" command in file manager, then double click on the extracted .exe file. Double clicking on the zip file in file manager and then double clicking on the exe file in the resulting window will not work.
User manual for V1.2 and later
This page describes the V1.2 and later versions of pcdMagic. For earlier versions, see the manual for version 1.1
The Windows
There are two key windows:
- The browser window, which presents a list of images. Note that the browser window can only browse folders that you have explicitly opened, or sub-folder of folders that you explicitly opened via the "open dialog". To go to a new folder, click the Folder icon in the top left corner of the window
- The develop window, which allows you to view and manipulate a single image. pcdMagic allows you to have multiple develop windows open at the same time, subject to available memory. You open a new develop windows by clicking an image in the browser, or by opening an image from the File menu.
In addition, there are subsidiary windows to display EXIF information, to manage camera profiles, and to manage presets.
Opening Base64 images
Base64 images are special high resolution versions of Photo CD images. They only exist on CD's marked as "Photo CD Pro". Opening these images requires that the entire contents of the original CD be available to pcdMagic, not just individual *.pcd files. For more information, see the page on Base64 images.
Adjusting Images In The Develop Window
- To zoom in and out, use the ⌘+ and ⌘- keys, or use the View menu.
- To zoom to a specific zoom ratio, use ⌘F to fit the image in the window, or ⌘1, ⌘2, ⌘3 or ⌘4 for 100%, 200%, 300% or 400% zoom ratios.
- To pan the image, click, hold and drag or use a two-finger scroll on a trackpad.
- Sliders can be adjusted with with the cursor or the stepper controls. Also, when you're in a text box, you can use the arrow keys, shift arrow keys and page up/page down keys to change control values.
- To reset a slider to its default value, double-click the text above it.
How to Crop Images
You can crop images by simply by selecting crop mode, and dragging the corners of the crop area.
Using Scanner Profiles
Normally the color profile is set automatically based on the metadata included into the image to match the film and scanner type. However, you can override the automatic setting by using the Color Profile drop-down menu.
Note that by default, only pcdMagic's internal color profiles are displayed for selection. However, you can chose to display all profiles installed on your system as well by changing the Preferences settings. This allows you to, for example, use the original PCD Kodak profiles if you have them available.
Using Presets
- To create a preset, click "New Preset" in the develop window. You can then chose which of the current image settings to use as part of the preset.
- In order to manage presets, go to the File->Manage Presets... menu.
Exporting
pcdMagic allows you to export in JPEG, TIFF or DNG format. JPEG images are exported in the sRGB color space, while TIFF and DNG images use ProPhoto.
Batch Operations
You can batch process images from the Browser Window:
- Select the location for the processed files in the drop down menu.
- Select all the images you want to process in the browser window. Simply use shift-click or cmd-click to select multiple files.
- Click the action menu on the bottom left of the Browser menu, and select the preset to use in the processing.
You can set pcdMagic to either overwrite existing files with the same name as batch processed files, or to create new names in pcdMagic->Preferences. New names are formed by adding "_n" to the existing name, e.g., "photo.pcd" will be exported as "photo_1.jpg" if "photo.jpg" already exists.

Integration with Other Applications
pcdMagic will work together with other apps as an external editor. For more information, see the page on App Integration.
Application integration
pcdMagic can be used as an external editor for Adobe applications such as Lightroom, Apple's Aperture, and other apps that support "external editor" functionality. When you choose to edit an image from one of those apps using pcdMagic as an external editor, the app will render a TIFF or JPEG from the Photo CD file and send it to pcdMagic. pcdMagic will then search for the corresponding Photo CD file, open the Photo CD file, and then overwrite the JPEG/TIFF from the calling program with pcdMagic's rendition of the Photo CD image. Depending on the app, the pcdMagic rendition will appear in Lightroom/Aperture/etc as an "alternate master", "version" or similar.
External editor setup
To use pcdMagic as an external editor for Lightroom, Aperture, etc, follow these steps:
- In pcdMagic, go to Preferences, and select the "App Integration" tab. Then set the location of your Photo CD files. pcdMagic will search subdirectories of this location, but will not be able to search outside of the directory you set. NOTE: if the Photo CD file location is not set, pcdMagic will not be able find the Photo CD file corresponding to the file sent to it by Lightroom/Aperture/etc. If you have multiple version of pcdMagic installed, you must do this for each version of pcdMagic individually.
- In Lightroom or Aperture, go to the Preferences dialog and activate the "External Editing" preferences tab.
- Select the version of pcdMagic that you have installed as the external editor. If you have multiple versions installed - e.g., both pcdMagic and pcdMagic Monochrome, or beta versions, you must set each version separately.
- Select an intermediate file format. pcdMagic supports both TIFF and JPEG, but we strongly recommend 16-bit TIFF using ProPhoto for the color space. Using JPEG or sRGB may result in banding or colors at the extremes of your camera's color gamut being desaturated.
- Set a file naming scheme. pcdMagic supports the default naming schemes of both Lightroom and Aperture. However, if you have a different application, or chose to change the default setting, make sure that the naming scheme follows one of the patterns below. If it does not, pcdMagic will not be able to locate the original Photo CD file corresponding to the file passed to it.
- Open the file you want to process within Lightroom, Aperture, etc, and open it for external editing in whatever version of pcdMagic you have installed. Make adjustments in pcdMagic as usual.
- When you've done with adjustments in pcdMagic, transfer the image back to the original app with the "Update Edited Image" button, under the "App Integration" section of the adjustments pane. Some applications - e.g., Aperture, may require you to quit pcdMagic before the new image shows in the original application. NOTE: it may take several seconds for the new image to show.
Intermediate JPEG/TIFF name format
For the intermediate JPEG or TIFF, you must configure Lightroom/Aperture/etc to use one of the following naming schemes so that pcdMagic can locate the Photo CD file:
- <FileName> where <FileName> is the Photo CD file name, e.g., "DSC_0049.TIF"
- <FileName>-Edit-<Digits> where <Digits> is a sequence of digits, e.g., "DSC_0049-Edit-1.TIF"
- <FileName>-<Digits> e.g., "DSC_0049-1.TIF".
- <FileName>_v<Digits> e.g., "DSC_0049_v1.TIF"
- <FileName> <Digits> e.g., "DSC_0049 1.TIF"
- <FileName>-<suffix> where suffix can be anything but FileName cannot contain any hyphens.
64Base image files
64Base images consist of multiple files - a base image, and a set of image extension files.
For pcdMagic to convert 64Base files, three things have to occur:
- You must specify 64Base as the resolution to load in Preferences->Conversion Settings. Note that the default setting for pcdMagic is to load only 16Base images, so as to avoid time consuming searches for image extension files.
- The directory structure must be the same as for the original CD. 64Base images consist of a 16Base PCD file and a number of image extension files. pcdMagic will only be able to find the extension files if the file structure (the relative locations) of the PCD file and the image extension files are the same as for the original Photo CD.
- pcdMagic's File Browser window should be open to the root of the directory containing the original CD's file structure. (The directory containing the CDI and PHOTO_CD subdirectories).
- You must open the Base file in pcdMagic - it will then find the extension files.
NOTE: It's very important that pcdMagic's file browser be opened to the root of the Base64 CD file structure, as described in (3). If this is not done, than pcdMagic will not be able to access the IPE files, and Base64 images will load as Base16
Directory Structure
The directory structure must look as follows (by way of example):
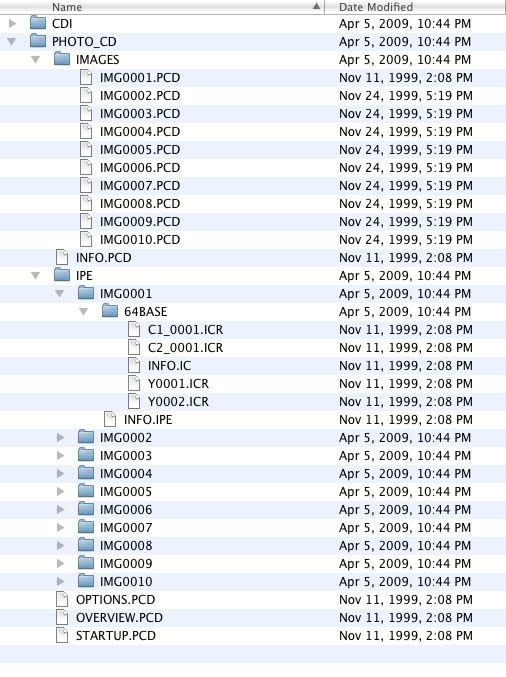
The critical part is that the relationship between the base file (e.g., IMG0001.PCD, the file you will open) and the extension files (for IMG0001.PCD, the C1_0001.ICR, C2_0001.ICR, INFO.IC, Y0001.ICR and Y0001.ICR in the IPE\IMG0001\64BASE\ subdirectory) must be as shown above. The process that pcdMagic follows is reverse out from the location of the base file to the CD root directory (PHOTO_CD in this case), then find the extension files relative to that.
pcdMagic is not sensitive to what the CD root directory (in this case the PHOTO_CD directory) is, but is sensitive to anything below that - the IMAGES and IPE subdirectory naming, and the names of any subdirectories and files in them.
User Manual for V1.1 and earlier
This page describes version 1.1 of pcdMagic for OS X. For the latest version, see the main manual page.
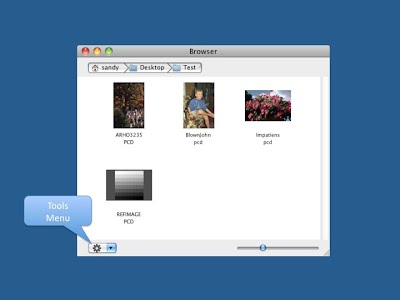
File Browser
The File Browser allows you to easy navigate around your images, displaying thumbnails of PCD files as you go.
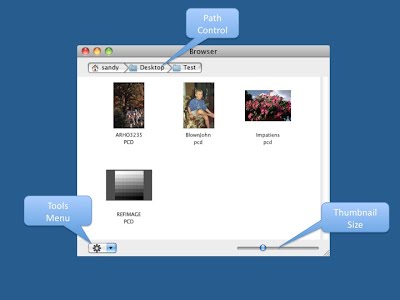
Moving around
You move around your hard drive as follows:
- To open a sub-directory, double click the sub-directory in the window.
- To move up a level, or up several levels, click the level that you want to move to in the Path Control.
Opening an image
To open an image, double-click it; the image will be opened in the Develop Module
Batch mode operations
You can convert a number of files by selecting them all, and then using the Tools menu. Batch mode operations are discussed more on the Batch Mode page.
Changing the thumbnail size
You can change the size of the displayed thumbnails by moving the Thumbnail size control on teh lower right-hand side of the window.
Displaying all files
By default, the File Browser displays only PCD images and directories. However, you can change it to show all files in the pcdMagic Preferences menu.
Develop Module
The Develop Window allows you to adjust the rendering of individual images.
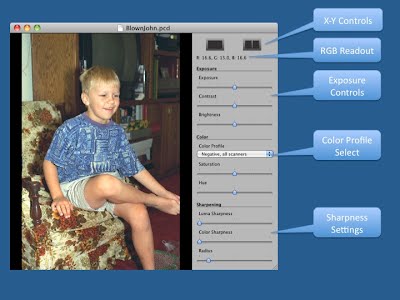
Moving around the Develop Window
You can find zoom controls under the View menu, or use the following keyboard shortcuts:
- To zoom in, use <Command +>
- To zoom out, use <Command ->
- To zoom to 1:1, use <Command 1>
- To zoom to fit the entire image, use <Command F>
- To pan the image, simply click anywhere inside the image, hold and drag
Setting the color profile
Normally the color profile is set automatically based on the metadata included into the image to match the film and scanner type. However, you can override the automatic setting by using the Color Profile drop-down menu.
Note that by default, only pcdMagic's internal color profiles are displayed for selection. However, you can chose to display all profiles installed on your system as well by changing the Preferences settings. This allows you to, for example, use the original PCD Kodak profiles if you have them available.
Adjusting the image
You can adjust exposure, contrast, sharpening, etc with the sliders on the right hand side of the screen.
X-Y mode
The buttons on the top right hand side of the window can be used to select between X-Y and Y only view; in X-Y view the unadjusted image will be displayed on the left of the screen, and the adjusted view on the right.
Note however that the color profile selection applies to both images as there is no default for the color space setting.
Getting an RGB readout
The RGB readout area show the RGB value of the pixel that cursor is pointing to, in the "Melissa RGB" space.
Exporting to JPEG, TIFF or DNG
You export your adjusted images by using the File->Export to... menu selection
Viewing image metadata
You can view all image metadata by opening the the inspector window, either by <Command I> or from the View menu. the metadata contains information such as film type, data scanned, scanner type, etc.
Batch Mode
Batch mode conversions are performed either via the tools menu in the File Browser, or by right-clicking selected files.
Batch mode conversion with default settings
To convert multiple files, follow these steps:
- Open a File Browser window (this is the default window that opens when pcdMagic first starts).
- Move to the directory that contains the files you want to convert. To move up a directory, click directory selection bar at the top of the screen, and to open a sub-directory, double-click it in the browser window.
- Select the file that you want to convert by shift-clicking and/or command-clicking.
- Once the files you want to convert are highlighted, click the tools menu button, and select one of "Export to JPEG with....", "Export to TIFF with....", "Export to DNG with...." and select "Default settings".
The files will then be exported, with either a JPG, TIF or DNG extension.
As an alternative to using the Tools menu, you can also right-click the selected files to get a context menu.
Batch mode conversion with custom settings
In order to perform batch mode conversion with custom settings - exposure, color profile, sharpening, etc, follow these steps:
- Open any PCD file in the Develop window (by double-clicking the file in the File Browser Window).
- Adjust that individual image to your liking in the Develop Window.
- Then switch to the File Browser window, and follow the procedure above, but after selecting "Export to....", select the settings of the file you adjusted rather than "Default Settings"
64Base Images
64Base images consist of multiple files - a base image, and a set of image extension files.
For pcdMagic to convert 64Base files, three things have to occur:
- You must specify 64Base as the resolution to load in Preferences->Conversion Settings. Note that the default setting for pcdMagic is to load only 16Base images, so as to avoid time consuming searches for image extension files.
- The directory structure must be the same as for the original CD. 64Base images consist of a 16Base PCD file and a number of image extension files. pcdMagic will only be able to find the extension files if the file structure (the relative locations) of the PCD file and the image extension files are the same as for the original Photo CD.
- You must open the Base file in pcdMagic - it will then find the extension files.
Directory Structure
The directory structure must look as follows (by way of example):

The critical part is that the relationship between the base file (e.g., IMG0001.PCD, the file you will open) and the extension files (for IMG0001.PCD, the C1_0001.ICR, C2_0001.ICR, INFO.IC, Y0001.ICR and Y0001.ICR in the IPE\IMG0001\64BASE\ subdirectory) must be as shown above. The process that pcdMagic follows is reverse out from the location of the base file to the CD root directory (PHOTO_CD in this case), then find the extension files relative to that.
pcdMagic is not sensitive to what the CD root directory (in this case the PHOTO_CD directory) is, but is sensitive to anything below that - the IMAGES and IPE subdirectory naming, and the names of any subdirectories and files in them.
Preferences
You can set a number of preferences:
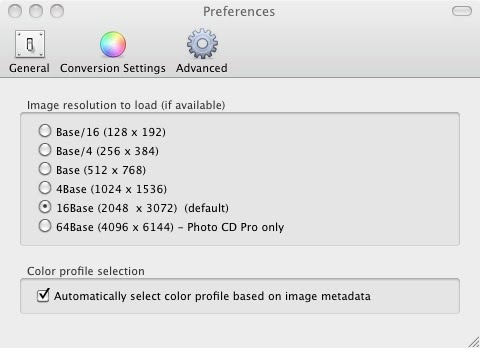
In the "General" Tab
- Show Splash Screen on start up. If this is enabled, the pcdMagic splash screen shows on every start. Note that clicking the splash screen hides it
- Show only PCD files in Browser. If this is disabled, all files are shown in the File Browser window.
In the "Conversion" Settings Tab
- Image Resolution to load. PCD files have multiple images embedded in them. This sets the maximum resolution to load when a file is opened in the develop window. Note that if the maximum resolution isn't available, the highest that is available will be loaded. You can find out what resolution was loaded in the Inspector window.
- Color Profile selection. This selects whether pcdMagic automatically assigns a profile to a image based on film type and scanner model. If automatic selection is disabled, the generic PCD profile is used.
In the "Advanced" tab
- Image Interpolation. This allows advanced interpolation to be disabled. If advanced interpolation is disabled, conventional interpolation, as used by the original Kodak software products, is used.
- Show external profiles. By default, pcdMagic shows only its internal color profiles. However, if you have the original PCD profiles as supplied by Kodak installed on your system, you can use those. To be able to see external profiles, enable the "Show external profiles" setting. Note that the profiles must be installed on your system as ColorSync profiles to be visible. See the Apple ColorSync Utility manual for details on how to do this.
- Disable Frame Buffer (FBO). Normally pcdMagic uses openGL, and specifically the Frame Buffer capabilities of the installed graphics adapter, to speed up zoom and pan operations in the develop module. However, some graphics adapters have bugs in their drivers that can result in application crashes or corrupted displays. In these cases, you can disable FBO operations - pcdMagic will fall back to a slower but safer display modes.
pcdMagic Trial for Windows 10 or later
You can download a trial of the latest version of pcdMagic for Windows 10 and later below.
You can download a trial of the latest version of pcdMagic for Windows 10 and later here as a standalone app. Downloads are subject to the pcdMagic Software License agreement.
Note: The trial version and the full version of pcdMagic are the same; entering a license key into the trial version enables all of the full version functionality.
Installation
pcdMagic is installed via Microsoft's "ClickOnce Deployment" technology. What you need to do is:
- Prior to downloading, ensure that you have all the latest updates installed on you PC, via the Microsoft Update manager found under Windows "Help and Support".
- Download pcdMagic for Windows Zip file.
- Extract all of the files from the Zip file to some convenient location (right click the Zip file, and select "Extract All"). This will create a pcdMagic directory at the same location as the ZIP file. Note: You can't install pcdMagic for Windows by just opening the Zip file and running the setup file from within the Zip archive - you must first extract all files.
- Once you have extracted all the files, run the "setup.exe" file in the pcdMagic directory. If you do not already have Microsoft's .Net 4 framework or the latest version of Microsoft's setup manager installed on your PC, this will be automatically downloaded and installed prior to pcdMagic being installed.
After you have successfully installed pcdMagic, you can delete the pcdMagic directory that was created when you unzipped the distribution file.
Uninstalling
pcdMagic can be completely uninstalled by using the Windows uninstall capability, found in the Control Panel, under "Programs and Features". Once the full list of installed programs is displayed, simply scroll to pcdMagic for Windows, and double click it.
Upgrading
To upgrade pcdMagic to a later version, just follow the same steps as for a new install. If you get an error message about "You cannot start application pcdMagic for Windows from this location because it is already installed from a different location", just uninstall pcdMagic from the Control Panel before installing the new version.
Note that upgrading may cause pcdMagic to "forget" your license code. Just re-enter it.
Quickstart
Using pcdMagic is easy - all you have to do is either to:
- Drag and drop image files onto the pcdMagic window, or
- Double-click image files in Windows Explorer.
Immediately on opening the file, pcdMagic saves a converted version of the file to the same location as the original file. You don't even have to save the file. It's that easy!
You can also use pcdMagic for Windows in more advanced ways - see the other articles on this site.
Main window
On startup, pcdMagic displays its main window:
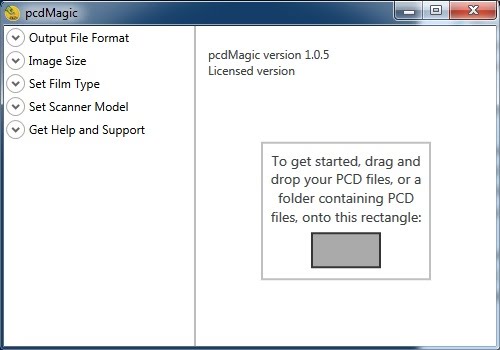
The window consists of two sections:
- The options area on the left hand side of the window, used to select options. Generally, you won't need to change any of these. pcdMagic automatically selects the best options for each image based on the image metadata, which gives pcdMagic a variety of data on the image, such as the type of film originally used, and details of the scanner. This part of the screen remain the same for all pcdMagic operations.
- The image area on right hand side of the window. Once you have dragged and dropped an image onto the pcdMagic window, the image is displayed here. The area is also used to display information on batch conversions, image properties, etc.
Hint: You can make the options area bigger or smaller by dragging the divider between the two area, even reducing the option area to nothing.
Setting the options
Each of the option areas can be expanded to show their details by clicking them. The various options are:
- Show Splash Screen on start up. If this is enabled, the pcdMagic splash screen shows on every start. Note that clicking the splash screen hides it
- Show only PCD files in Browser. If this is disabled, all files are shown in the File Browser window.
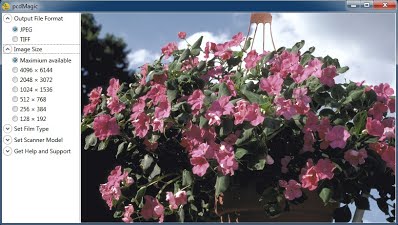
Output File Format
This allows you to select either JPEG or TIFF format. The default is JPEG.
Set Film Type
Normally pcdMagic autodetects film type, and sets the color profile to match. However, if this was incorrectly set at the time the image was scanned, you may be able to get more pleasing color by manually overriding this setting.
Set Scanner Model
The scanner model used to perform the original scan also effects color rendition. Normally pcdMagic autodetects scanner model, and sets the color profile to match. However, if this was incorrectly set at the time the image was scanned, you may be able to get more pleasing color by manually overriding this setting.
Get Help and Support
The help and support area allows you to:
- Get information on the version number of pcdMagic for Windows
- Enter your license code
- Get support
Develop module
The Develop Window allows you to view individual images, and see the effect of making changes to the settings on the left hand side of the screen.
pcdMagic automatically goes into the Develop Window if you either:
- Drag-and-drop single file onto the pcdMagic window, or
- Double-click a file in Windows Explorer to open it.
Moving around the Develop Window
You can find zoom controls under the View menu, or use the following keyboard shortcuts:
- To zoom in, use the <+> key
- To zoom out, use the <-> key
- To zoom to 1:1, use the <1> key
- To zoom to fit the entire image into the window, use the <f> key
You can also use the context menu (right-click the image) to zoom. The context menu also allows you to:
- Return to the start screen, or
- Show the image's metadata. The metadata contains information such as film type, data scanned, scanner type, etc.
Setting the color profile
Normally the color profile is set automatically based on the metadata included into the image to match the film and scanner type. However, you can override the automatic setting by using the "Film Type" and "Scanner Model" selections on the left hand side of the screen.
Exporting to JPEG, TIFF
You don't need to take any action to export a converted file. As soon as any file is opened by pcdMagic, it is instantly converted to the format selected by the various settings on the left hand side of the screen. If you change any of the settings while image is displayed, the exported image is immediately updated on disk. The exported image can be found in the same directory as the original PCD image.
Viewing image metadata
You can view all image metadata by right-clicking the image, and selecting "Properties".
Batch mode
Batch conversions are really easy using pcdMagic for Windows. All you need to do is drag-and-drop either a directory containing PCD files, or a selection containing multiple files onto the pcdMagic window. pcdMagic then automatically goes into batch mode, and will process each file individually, showing the results on the screen shown below.
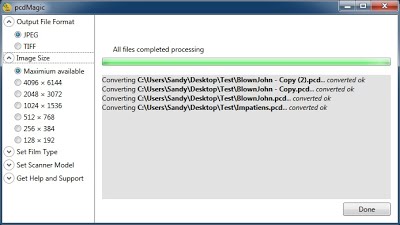
Important notes on batch conversions
- Whatever the settings you have selected on the left hand side of screen apply to all files converted.
- If you drop a directory onto pcdMagic, pcdMagic only looks for files with a ".pcd" or ".PCD" extension. In addition pcdMagic doesn't look in sub-directories.
64Base images
64Base images consist of multiple files - a base image, and a set of image extension files.
For pcdMagic to convert 64Base files, three things have to occur:
- You must specify 64Base as the resolution to load in "Image Size" in the Options Area. Note that the default setting for pcdMagic is to load only 16Base images, so as to avoid time consuming searches for image extension files.
- The directory structure must be the same as for the original CD. 64Base images consist of a 16Base PCD file and a number of image extension files. pcdMagic will only be able to find the extension files if the file structure (the relative locations) of the PCD file and the image extension files are the same as for the original Photo CD.
- You must open the Base file in pcdMagic - it will then find the extension files.
Directory Structure
The directory structure must look as follows (by way of example):
The critical part is that the relationship between the base file (e.g., IMG0001.PCD, the file you will open) and the extension files (for IMG0001.PCD, the C1_0001.ICR, C2_0001.ICR, INFO.IC, Y0001.ICR and Y0001.ICR in the IPE\IMG0001\64BASE\ subdirectory) must be as shown above. The process that pcdMagic follows is reverse out from the location of the base file to the CD root directory (PHOTO_CD in this case), then find the extension files relative to that.
pcdMagic is not sensitive to what the CD root directory (in this case the PHOTO_CD directory) is, but is sensitive to anything below that - the IMAGES and IPE subdirectory naming, and the names of any subdirectories and files in them.